
 English
 Arabic

Key Takeaways
- A 6 m vertical wall is installed in fourteen steps, with six hold points where work stops until the named person signs.
- Each panel is cut to its own measured height, minus 20 mm for the 10 mm joints at the bottom and top.
- Every joint is 10 mm vAdhesive, filled 200 mm deep with no voids, and each panel joint is tied with four vNail sets.
- Finishes start only after the wall is accepted and at least 24 hours have passed since the last joint.
A full-height ALC wall panel that stands 6 m tall needs a plan before it needs a crew. A 6 m vPANEL 200 weighs about 0.71 t, and any panel over 3,000 mm or 100 kg is moved by machine and never by hand. So every panel is cut, lifted, set and tied in a fixed sequence with a panel installation machine, a machine that clamps, tilts and carries each panel.
This article sets out how we handle a vertical installation, from the first drawing check to the final finish. It follows our method statement for 6 m vPANEL 200, the written site procedure, which runs to fourteen steps and six hold points. A hold point is a stop in the work: nothing continues until the named person has checked and signed. To keep the numbers concrete, we use a wall from one of our Johor data centre projects as the example, and every wall follows its own drawings.
What Does a 6 m Vertical ALC Wall Look Like?
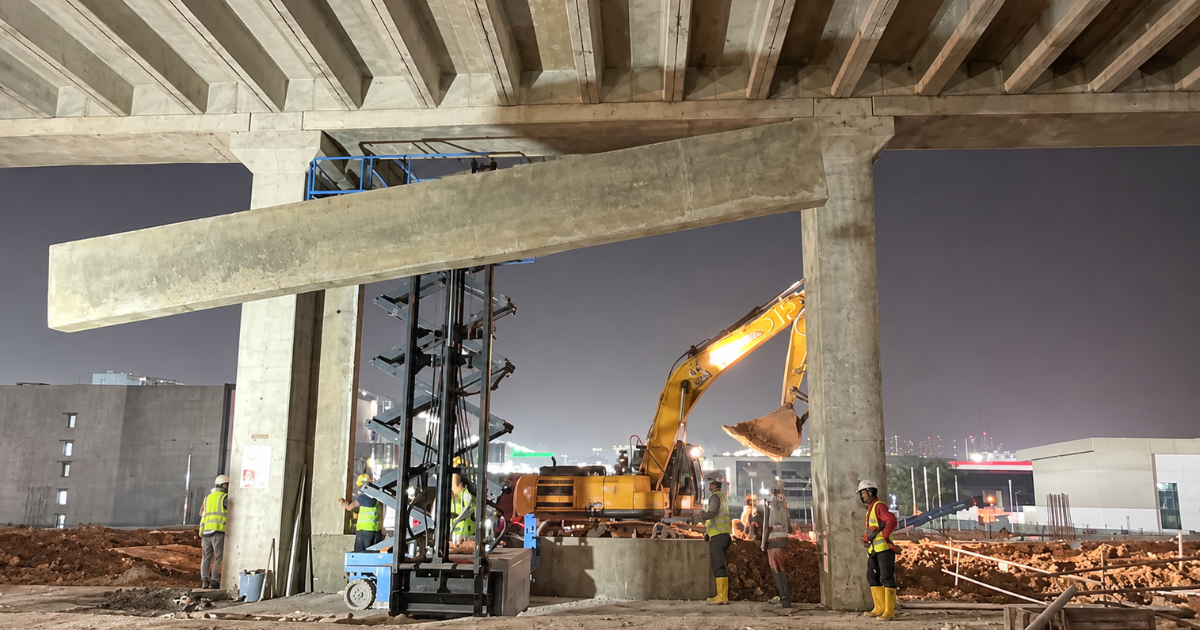
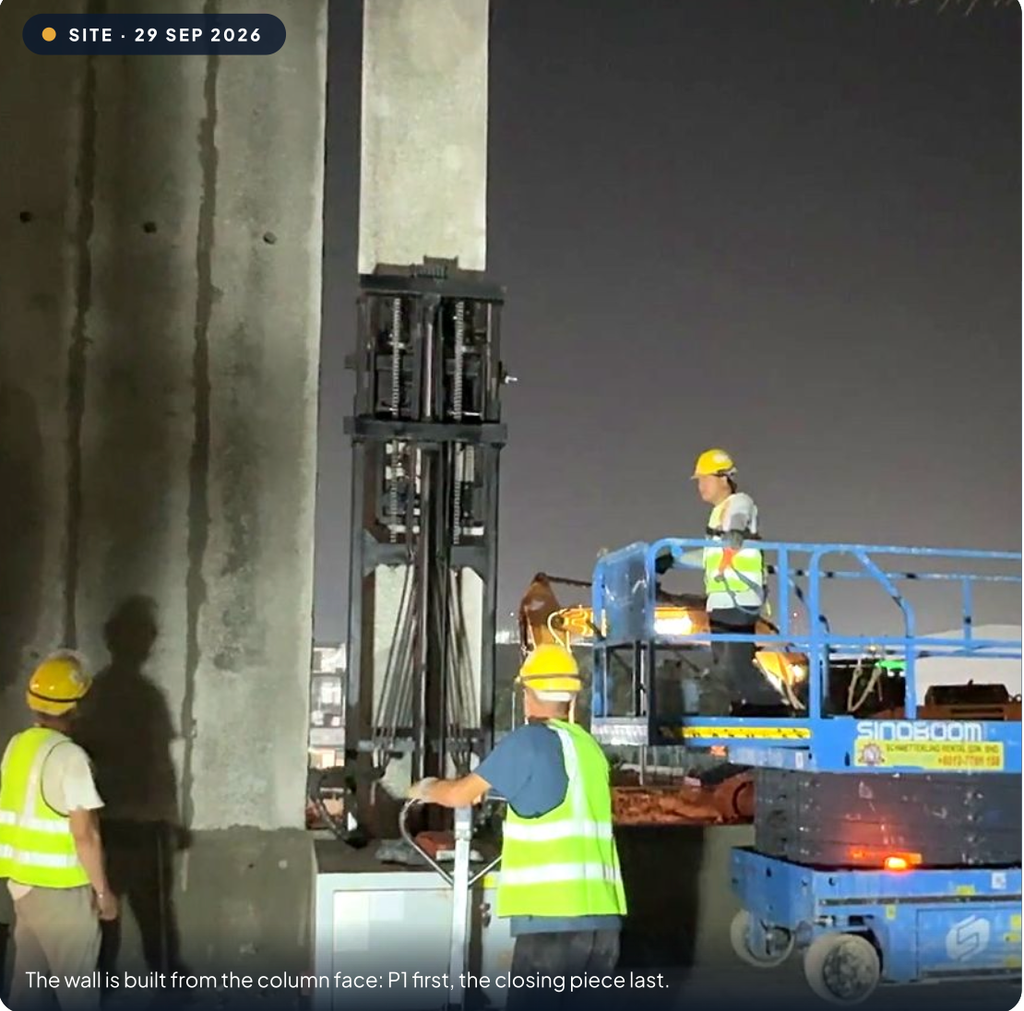
Each panel stands upright in one piece, from the reinforced concrete curb at the bottom to the edge beam above. It sits on a 10 mm bed joint (the joint at the base) and finishes under the beam with a 10 mm head joint (the joint at the top). Panels are joined edge to edge with vAdhesive, our jointing adhesive, and tied with vNail, a steel tie bracket pinned into the panel edge and anchored to the concrete. At the columns, panels are bonded with adhesive only, with no drilling into the columns. The wall is built from one column face, with the first panel set first and the closing piece, the last narrower panel that fills the remaining gap, set last.
In the data centre example, the wall was 7,600 mm wide between column faces and 7,050 mm high from curb to edge beam: a 1,050 mm curb, a 10 mm bed joint, a 5,980 mm panel and a 10 mm head joint. The panels were vPANEL 200, 200 mm thick and 660 mm wide. The layout was eleven full panels at 660 mm, one closing piece at 210 mm and thirteen 10 mm joints, which adds up to 7,600 mm. The wall needed twelve panels and covered 45.6 m².
Who Is Responsible for What on Site?
In our method statement, we receive and store the panels and vAdhesive, set out, cut, lift and place each panel, bed, joint and tie it, then cure and protect it. We also apply the joint waterproofing, vPlaster (the render coat) and vBaseskim (the skim coat), carry out the checks, keep the records and hand the work over.
The main contractor builds the curb, columns, edge beam and slab. The project engineer designs the anchor type, the embedment and the 6 m span. The final finishing layer follows the architect’s specification and is applied by others.
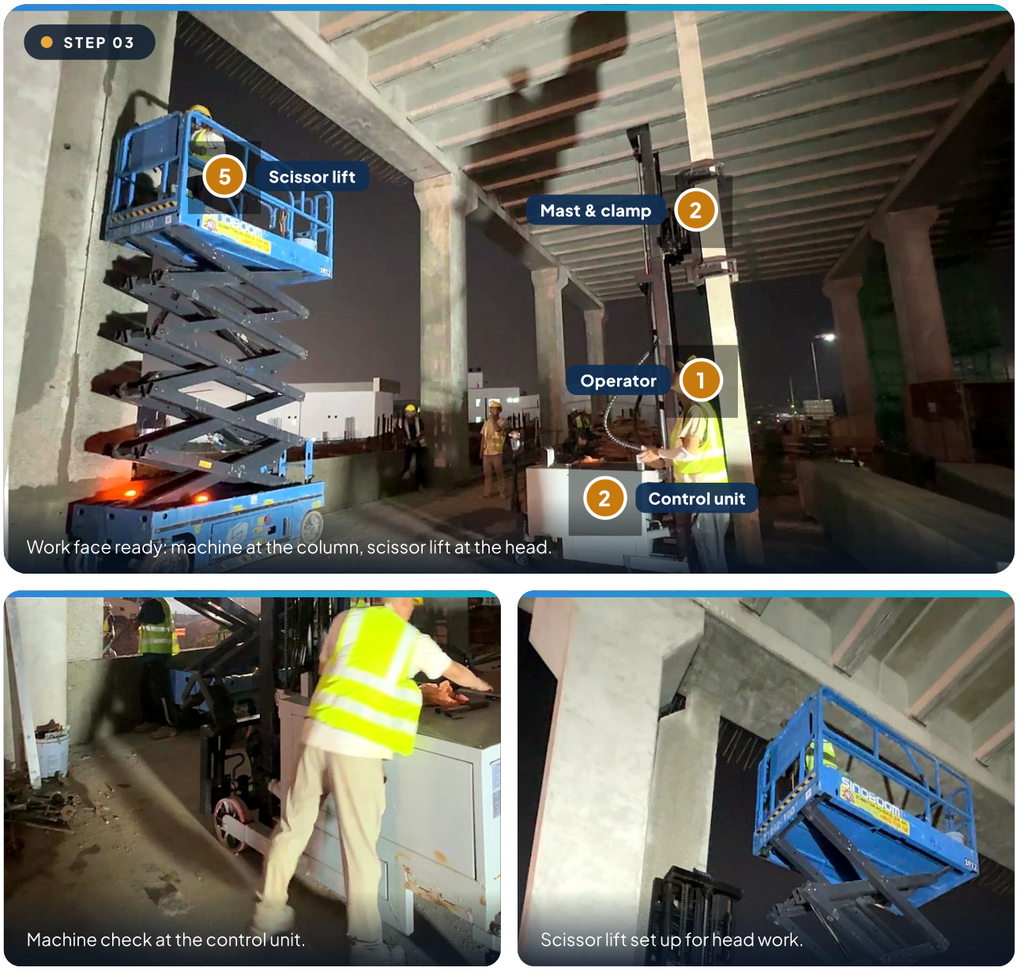
In the data centre example, the crew was about nine people per shift, with one supervisor and one signaller. A scissor lift gave two installers access to the top of each panel.
What Is Done Before the First Panel Goes Up?
The crew works only from the current issue of the drawings. On delivery, the label is checked against the order for thickness, length and density, the width is tape-checked, and every chip or crack is photographed and written on the delivery order before it is signed. Bundles are unloaded with the forks under the bearers, never under the panels, and stacked no more than two high with the wrap kept on until use.
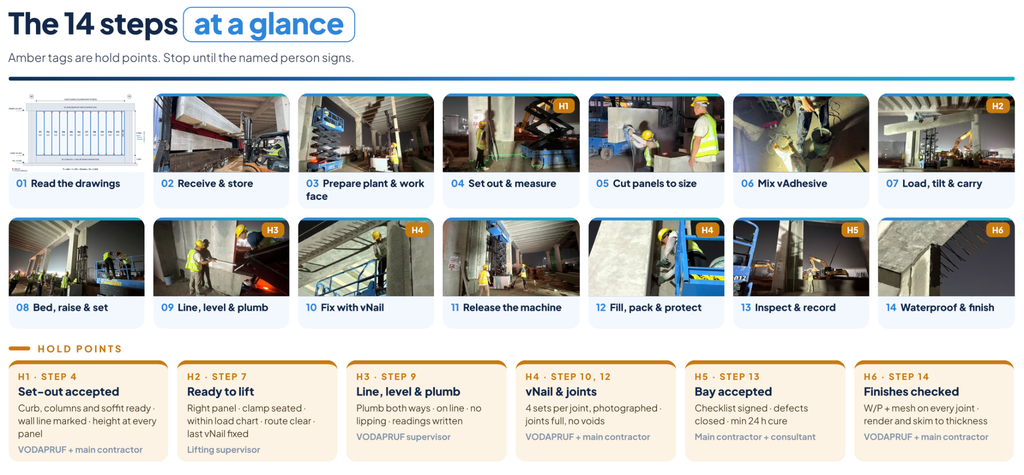
Before lifting starts, the machine is checked with no load, and its load chart must cover the panel weight at full height. The work area, the route and the stack are barricaded. Then comes set-out, the marking of the wall line and every panel position. A laser marks the wall line on the curb and carries it up the columns to the underside of the beam, panel edges are marked from the first column face, and the height from curb to beam is measured and written down at every mark. This is the first hold point: the supervisor and the main contractor sign the set-out sheet before any lifting.
Why Is Each Panel Cut to Its Own Height?
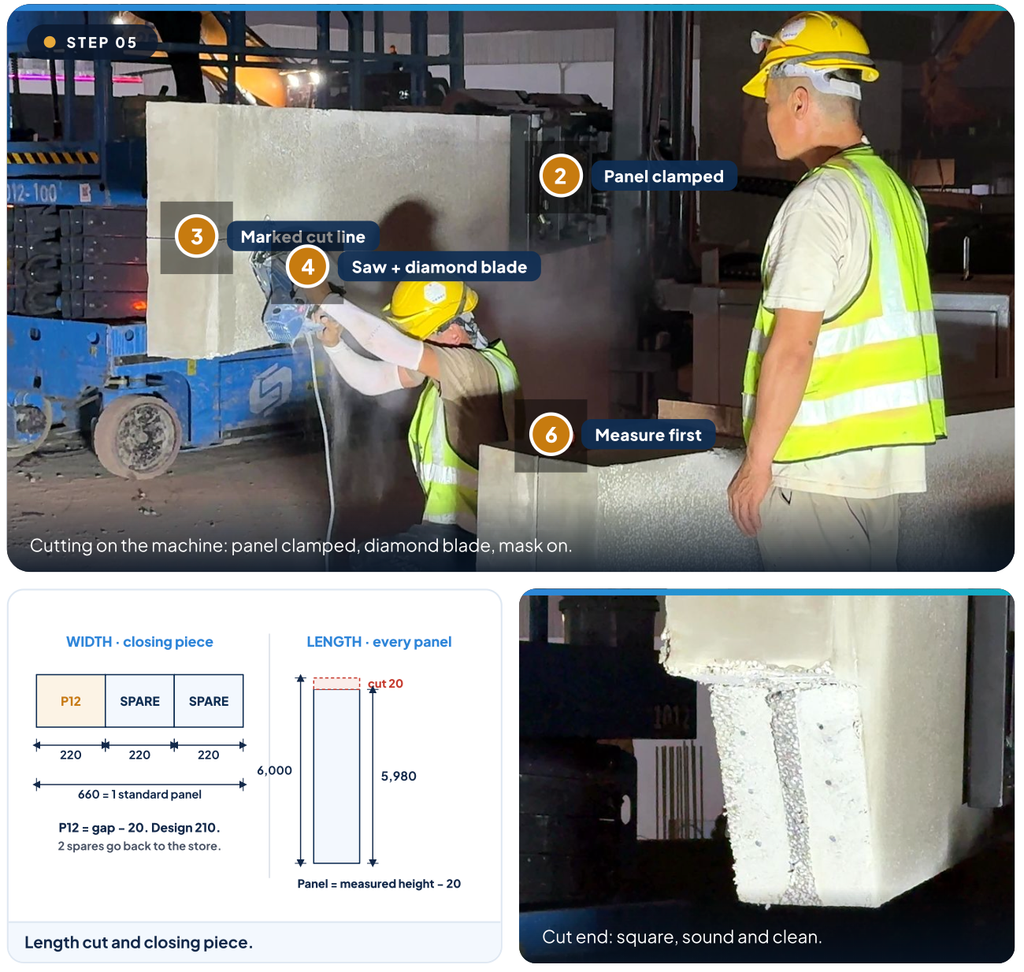
Panel length is the measured height minus 20 mm, which allows for the 10 mm joint at the bottom and the 10 mm joint at the top. At a 6,000 mm design height, that gives 5,980 mm. If a measured height is over 6,020 mm, a 6,000 mm panel is too short, so the crew stops and reports it.
Cuts are made wet with a circular saw and diamond blade, or with dust extraction, and the cut faces are checked for square, straight and clean. The closing piece is cut last. Once the last full panel is set, the gap is measured at the base, middle and top, and the closing piece is the smallest gap less 20 mm. In the example, that was 210 mm, cut from one standard 660 mm panel.
How Is vAdhesive Mixed and Used?
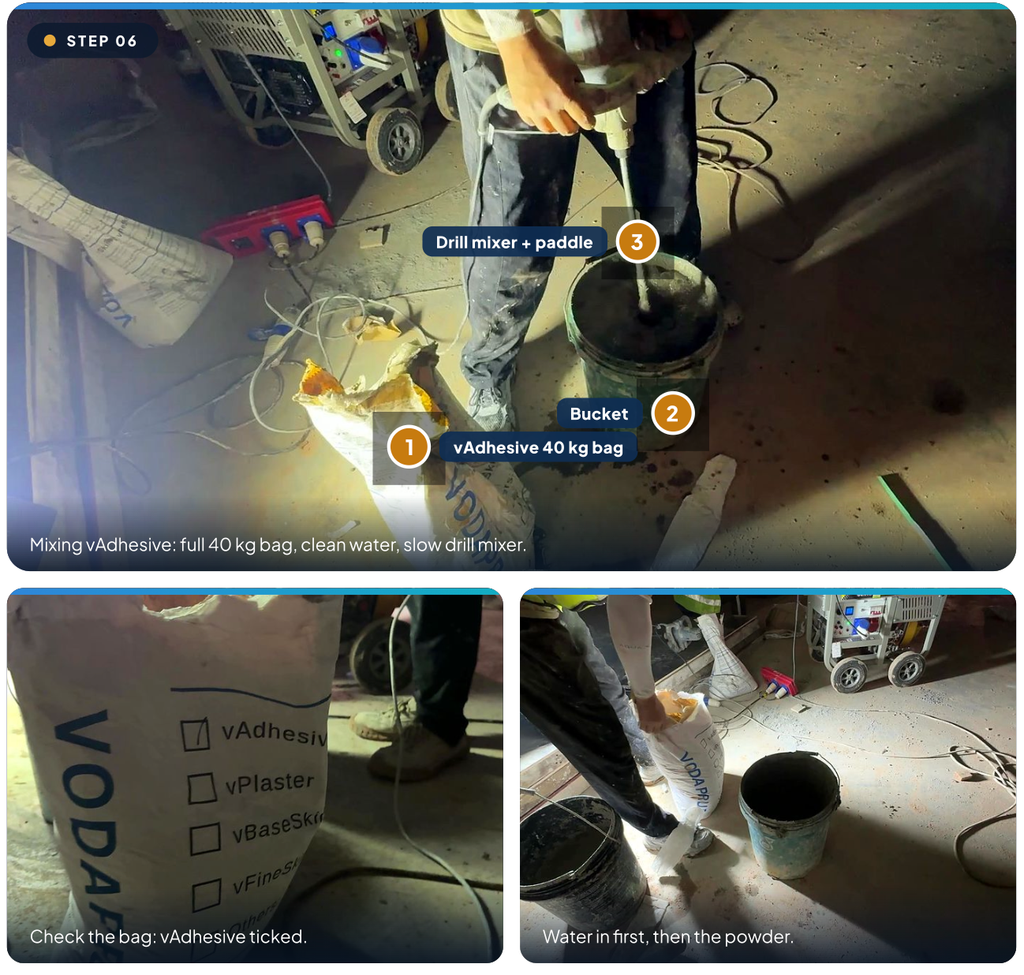
vAdhesive comes in 40 kg bags, mixed with 9 to 11 L of clean water. Water goes into the bucket first, then the full bag is added while mixing with a drill mixer at no more than 600 rpm. After about five minutes of mixing, the mix stands for two to three minutes and is mixed again briefly.
A bag is mixed only when the next panel is ready to lift, and it is used within about 50 minutes. Water is never added to a stiff mix. The data centre wall needed about 31 L for the vertical and bed joints, so the crew allowed two bags and recorded the bags actually used.
How Is a 6 m Panel Lifted, Set and Aligned?
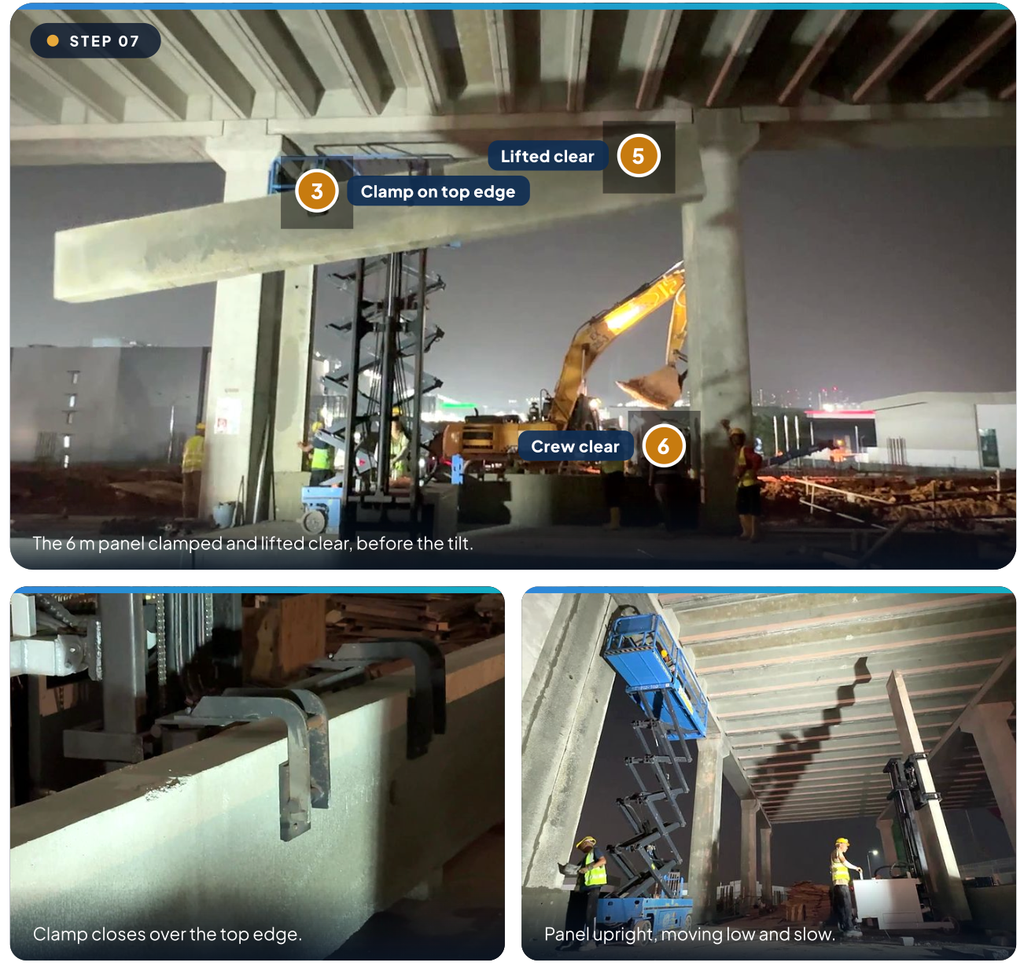
Before every lift, the lifting supervisor checks that the right panel is selected, the clamp is seated, the load is within the chart, the route is clear and the last panel’s vNail sets are fixed. This is the second hold point. The machine then clamps the top edge, lifts the panel clear of the stack, tilts it 90 degrees to upright and travels low and slow to the wall line. One signaller gives all signals, two guides keep their hands on the panel ends only, and everyone stays out of the tilt zone.
At the wall, a 10 mm bed of vAdhesive is spread on the curb across the full 200 mm width. The column face or the previous panel’s edge is buttered, and so is the edge of the new panel. The operator raises the panel while two installers on the scissor lift guide the top under the beam. The panel is lowered straight down, never dragged, then pushed sideways to close the joint to 10 mm and tapped with a rubber mallet until adhesive squeezes out along the whole joint.
The adhesive gives about 20 minutes of open time, so the panel stays clamped and is checked straight away. On a Johor data centre site, one vPANEL was installed in under 15 minutes using a panel installation machine.
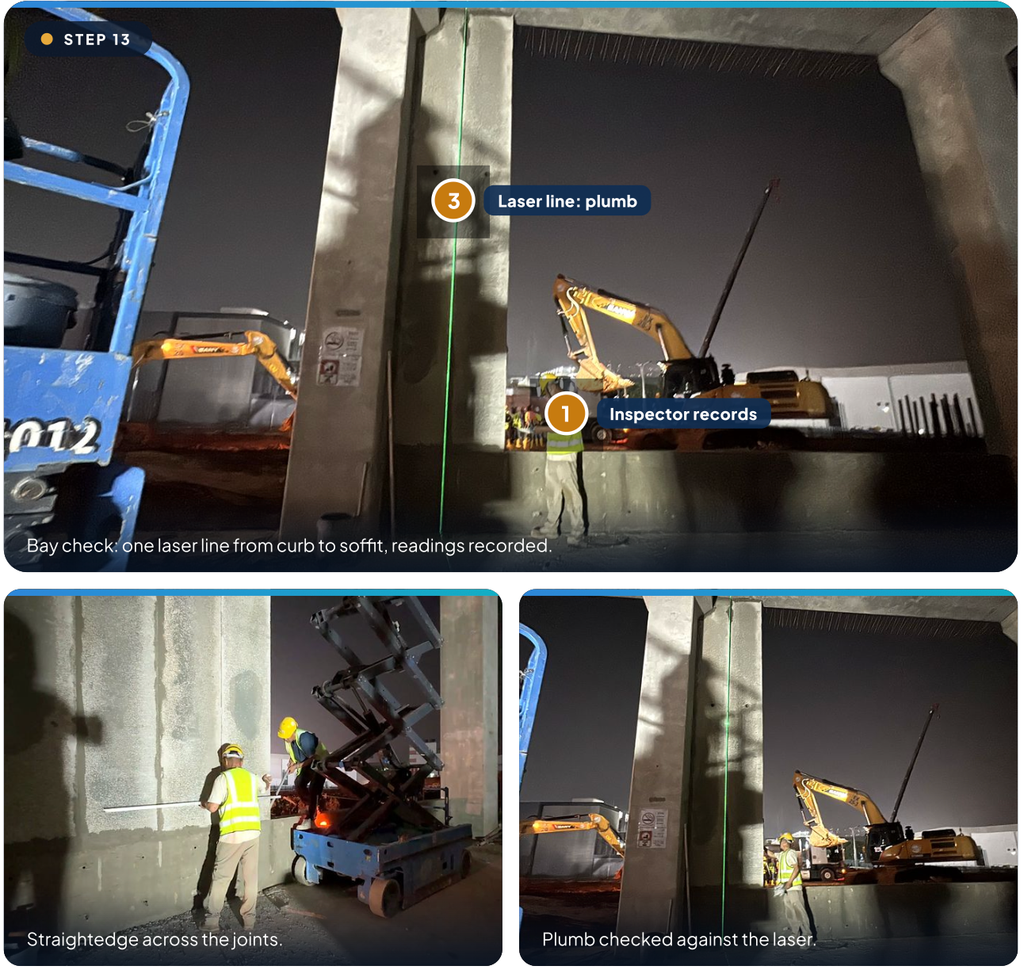
The check covers plumb (true vertical) both ways with a spirit level on the free edge and on the face beside the joint, lipping (a step between neighbouring panels) with a straightedge at the base, middle and top, and the laser line along the joint. The third hold point requires the supervisor to check and sign with the panel still clamped. Only then is the panel tied with vNail.
How Is Each Panel Tied with vNail?
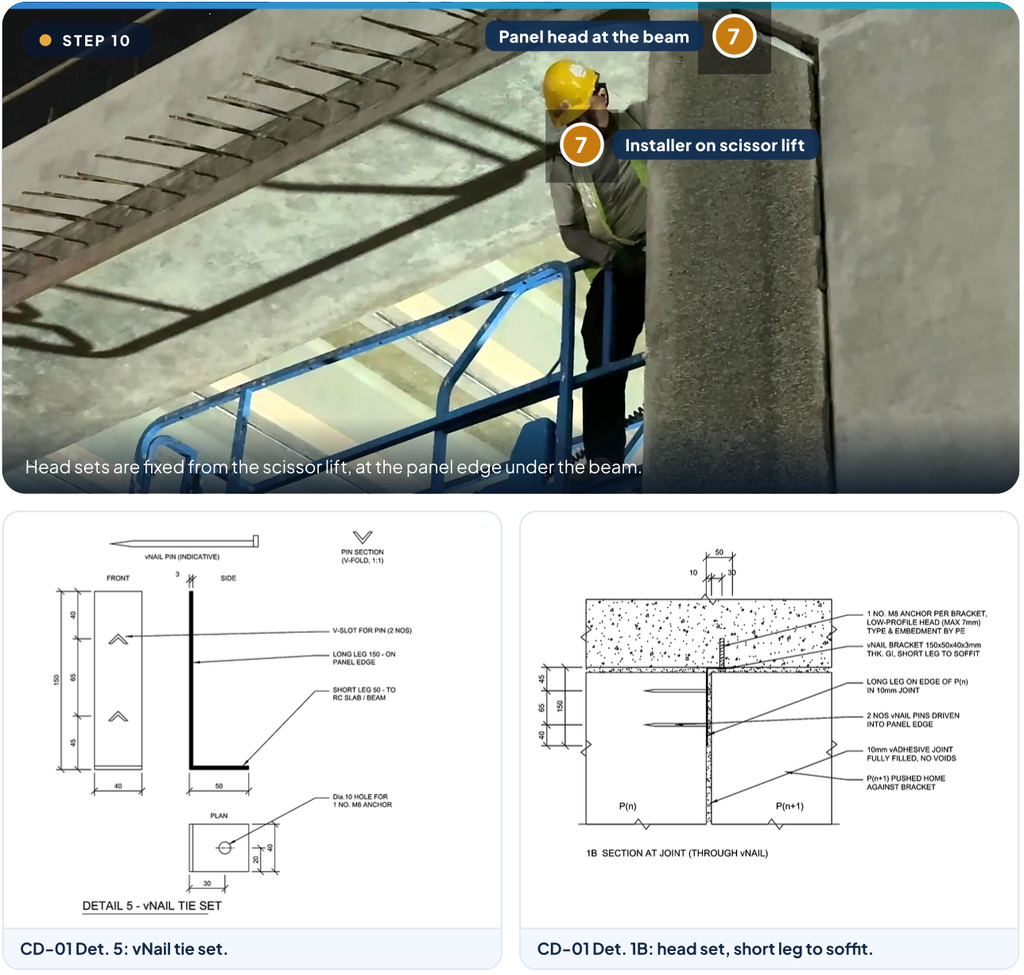
A vNail set is a GI bracket of 150 × 50 × 40 × 3 mm, two vNail pins and one M8 anchor. Each panel joint takes four sets: two at the top and two at the base, positioned 30 mm in from each face. Each spot is scanned for rebar before drilling.
The long leg of the bracket sits flat on the panel edge, inside the 10 mm joint, and the two pins are driven fully home through the V-slots. The short leg sits on the curb or the underside of the beam and is fixed with an M8 anchor through a Ø10 hole, with the head no higher than 7 mm. Anchor type and embedment depth are set by the project engineer.
In the data centre example, the eleven panel joints took 44 sets. The supervisor counts the sets, checks the pins and anchors, and photographs the top and base sets before the next panel hides them. This is the fourth hold point, covering the vNail sets and the joints.
What Happens After the Panel Is Set?
The machine is released only when the plumb check is signed and the four vNail sets are fixed. On the supervisor’s call, the clamp opens and the mast is lowered clear of the top edge. Plumb is re-checked at once. If the panel has moved, it is re-clamped and reset within the open time. If it is too late, the panel is taken out and re-jointed with fresh adhesive.
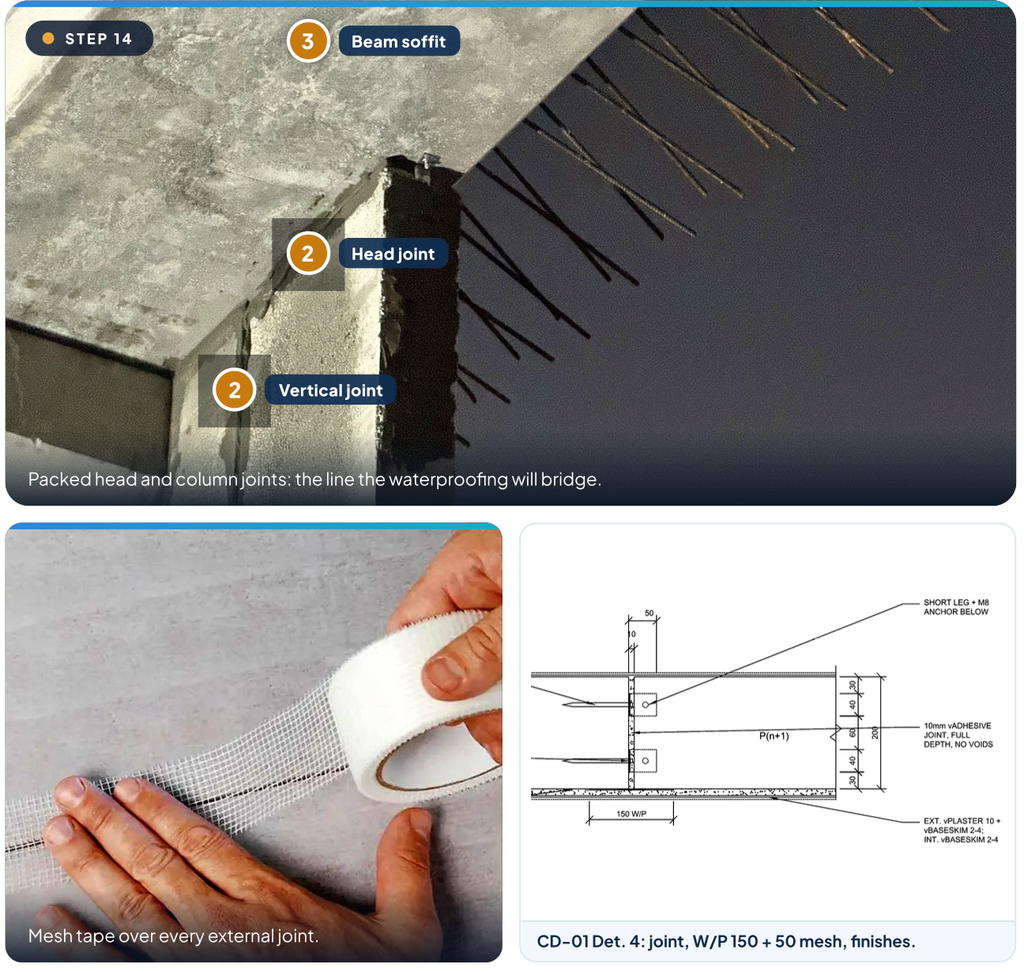
Once the panels are in, the 10 mm joint at the top is packed solid over the vNail, and every vertical and column joint is filled 200 mm deep with no voids. Joints are struck off flush while fresh, and each panel is tagged with the time of its last joint. The fresh joints are then protected from rain and sun for at least 24 hours, with no drilling, loading or knocks.
The wall is then inspected and recorded. The crew signs the panel checklist, files the vNail photos, records plumb, line and lipping at every joint, and walks every joint to full height, re-jointing any hollow joint with fresh vAdhesive. An inspection request goes in with the checklist, readings and photos. The main contractor and consultant then inspect the wall jointly, and the first wall sets the standard. Their acceptance is the fifth hold point, and it comes at least 24 hours after the last joint.
How Is the Wall Waterproofed and Finished?
Finishing starts only after that acceptance. On the external face, every joint and the interface with the reinforced concrete gets two coats of waterproofing, 150 mm wide, with a 50 mm mesh tape bedded in the waterproofing and lapped onto the column, curb and beam. A 10 mm coat of vPlaster follows and is kept damp for at least three days. Then a 2 to 4 mm coat of vBaseskim goes over the dry render.
Inside, vBaseskim is applied at 2 to 4 mm, continuous over the joints and onto the column. The render must be flat to within 3 mm under a 2 m straightedge. The sixth hold point has the waterproofing, mesh, render and skim checked before the architect’s finishing layer is applied by others.
How Do Hold Points and Safety Controls Work?
The six hold points run through the fourteen steps: set-out accepted, ready to lift, line, level and plumb, vNail and joints, wall accepted, and finishes checked. Work stops until the named person signs. The method statement also carries an inspection and test plan and a panel checklist for each wall.
On safety, the lifting zone is barricaded, a banksman guides the forklift, and lifting stops in rain, lightning or strong wind. Anyone on site can stop the work if it is not safe.
Planning a 6 m Vertical ALC Wall?
Send us your drawings, wall heights and specification, and we will take you through the panel schedule and installation sequence for your project. You can reach us on WhatsApp or email to inquiry@vodapruf.com.
📞 Malaysia: +60 16 217 7155
📞 Singapore: +65 9796 5910
🌐 vodapruf.com
Frequently Asked Questions
What is the longest vPANEL that can be installed vertically?
Our vPANEL lengths run from 1.5 m to 6.0 m, so a 6 m panel can stand in one piece from slab to beam. Length is fabricated to the project, and customised lengths carry a longer lead time, so confirm panel sizes early.
What is the difference between vertical and horizontal ALC panel installation?
Vertical panels are cast up to 6 m and set from slab to soffit, so joints fall at the top and bottom only. Horizontal panels at 600 × 1,200 mm suit short infill or a restricted lift, but leave a joint every 600 mm. The right choice depends on wall height and site access.
When should short panels be used instead of full-length panels?
Full-length panels need clear access, and in return give fewer joints, faster installation and a lower accessory bill. Low headroom, a narrow lane or limited crane reach calls for a 1.5 m short panel, sectioned cuts or a horizontal cast. Share the site limits early so panel lengths can be planned around them.
What panel thickness suits a 6 m external wall?
Thickness follows wall height, wind load and span, and the project engineer confirms the design. Specification wise, external walls above 5 m under wind step up to 150 to 200 mm, while internal or short external walls at 4 m or below can stay at 100 mm.
What should a site prepare before 6 m ALC panels arrive?
Prepare a firm, level, dry and lit storage area near the wall, a clear route to the wall, and a mixing station on level ground with a drip tray. A scissor lift should be ready for work at the top, and the machine’s load chart must cover the panel weight at full height.
Can 6 m panels be installed in rain or strong wind?
Lifting stops in rain, lightning or strong wind, and only a trained operator runs the panel installation machine. Fresh joints are also protected from rain and sun for at least 24 hours. It helps to allow for weather stops in the programme, especially on external walls.
Is a 6 m ALC wall panel suitable for data centre walls?
We have installed a 6 m vPANEL 200 vertical external wall on a Johor data centre project. Suitability depends on the specification, since acoustic and thermal requirements can drive density, as in ALC panels for data centres in Malaysia. Share your specification so we can match the panel to it.