
 English
 Arabic
Key Takeaways
- Filling the void between two concrete slabs is a genuine site challenge when low headroom, beams, and pipework restrict access, and the method chosen affects installation time, labour, and future maintainability of the space.
- Vodapruf’s plaster method eliminates the separate XPS board layer, applying LIGHTHERM Drymix Plaster directly in successive 75mm layers on a vertical face, progressing from the access point inward, removing board-cutting and board-fitting labour entirely.
- The plaster method avoids drilling holes through the upper slab, which the alternative pour-in method requires for material placement, along with the associated scanning, coring, patching, and waterproofing reinstatement that comes with it.
- Progressive placement allows each working face to be inspected before the next layer covers it, addressing the common concern with concealed pour methods, where gaps behind beams or around services can go unnoticed until it is too late to correct them.
- Any void-filling approach still requires project-specific confirmation. Layer thickness, recoat interval, fill extent, service access requirements, and final closure detail all need sign-off from a structural consultant and a representative site trial before full-scale installation.
Turning Unused Voids Into a Solution
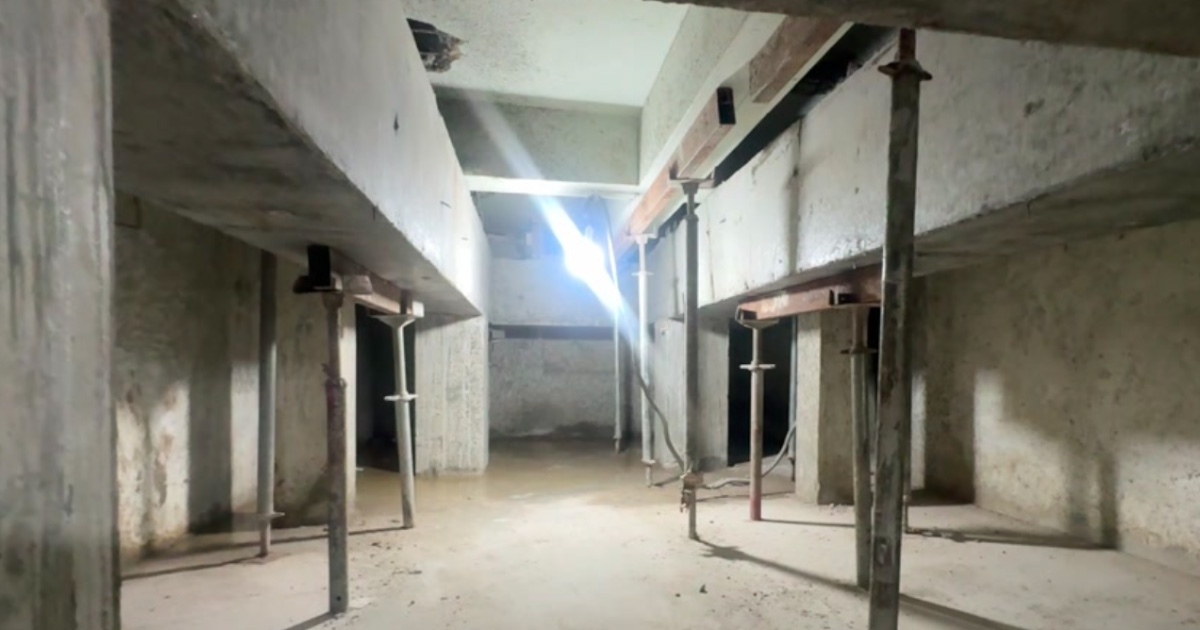
Spaces between concrete slabs are notoriously difficult to fill properly. Low headroom, structural beams, and existing pipework all restrict access, and the real challenge is not simply getting material into the cavity, but placing it consistently throughout the required area while keeping the installation practical and future maintenance possible. This is a recurring problem on renovation and retrofit projects across Singapore and Malaysia, and Vodapruf has developed a lightweight concrete infill approach specifically for restricted double-slab voids using LIGHTHERM.
Two Ways to Fill the Void
There are two general approaches to filling a double-slab cavity, and each carries different implications for labour, access, and inspection.
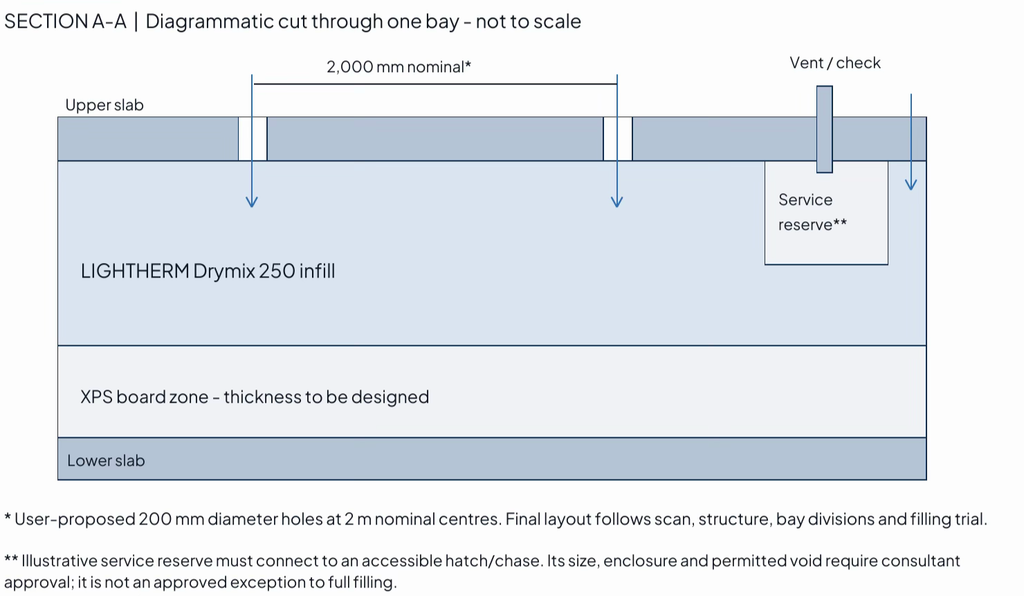
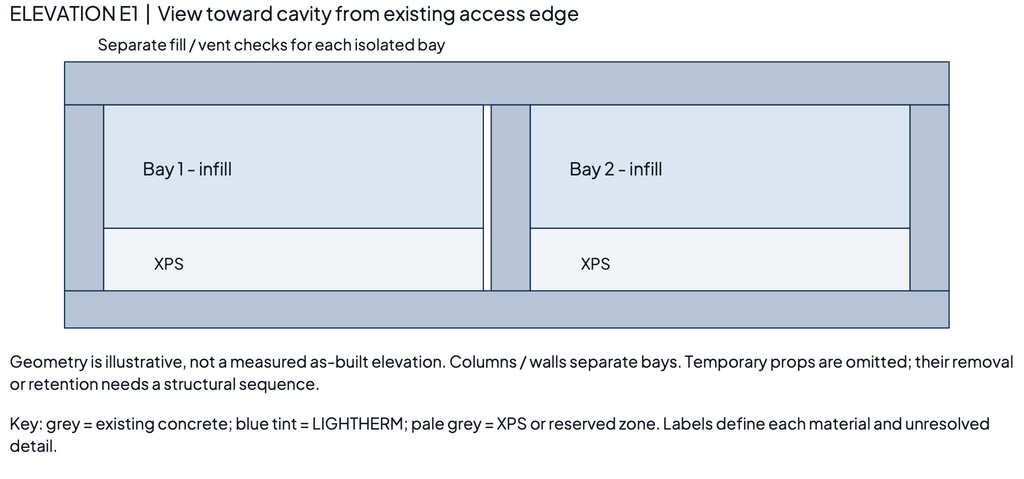
The conventional approach combines XPS insulation boards in the lower part of the cavity with LIGHTHERM Drymix 250 poured in from above through openings in the upper slab. The boards are fitted around existing structure and any approved service reserves, then restrained against movement or flotation during the wet pour. Filling typically uses 200mm diameter holes at nominal 2-metre intervals, though the exact layout must be confirmed by the structural consultant after checking reinforcement, tendons, services, and slab capacity, since beams and separate bays may require a different arrangement of filling, vent, and inspection points. Displaced air needs an approved escape route as the pour proceeds, so high-point vent and check locations are required for each isolated pocket, and a representative trial bay is used to establish how far the mix actually travels around obstructions before the full area is filled.
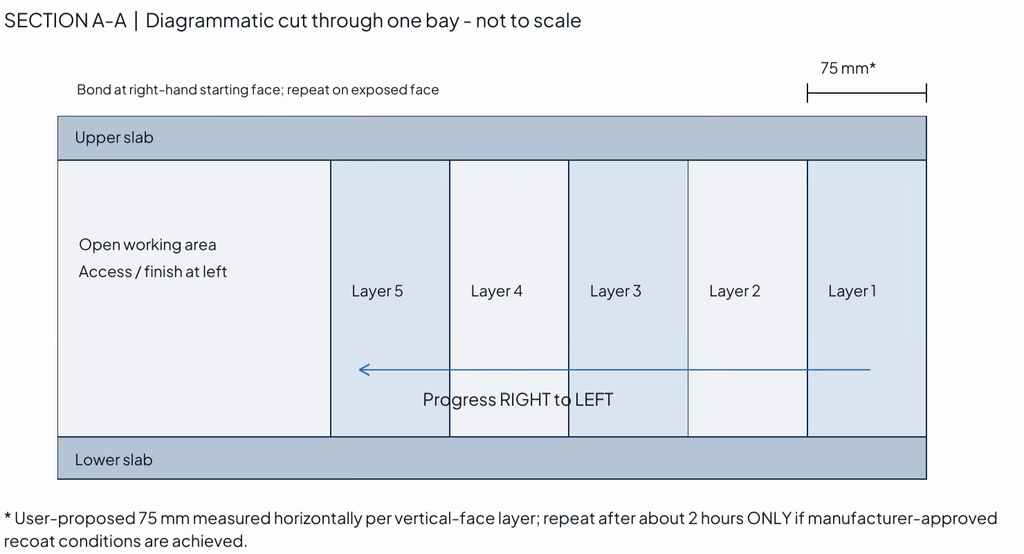
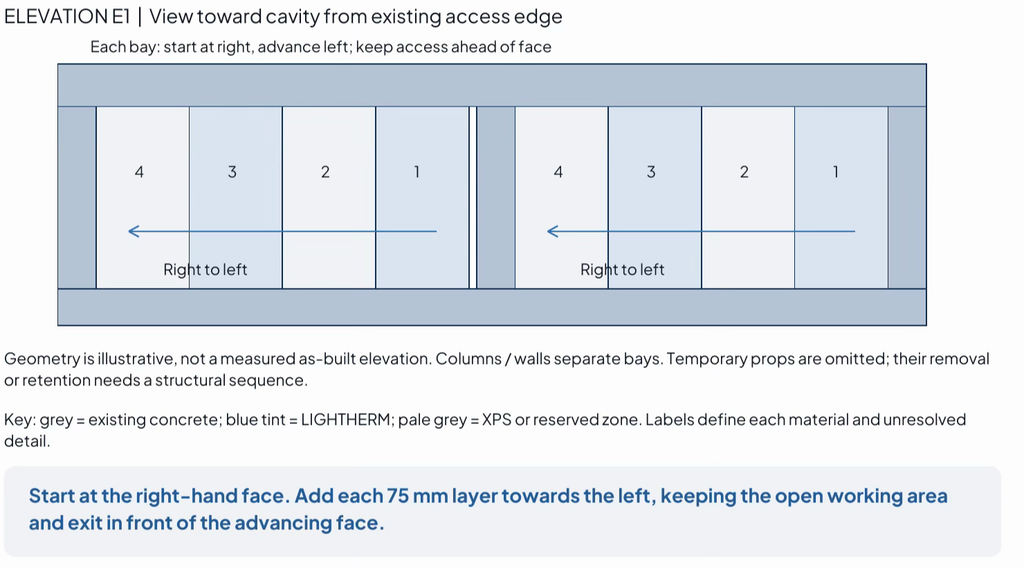
The simplified approach, and the one Vodapruf recommends where site conditions allow, eliminates the XPS board layer entirely. Working from inside the cavity, LIGHTHERM Drymix Plaster is trowel-applied directly onto a vertical face in successive 75mm layers, measured horizontally, progressing from the access point inward with roughly two hours between applications. Because there is no rigid board to cut and fit around obstructions, the contractor can work progressively around the actual cavity geometry as the filling face advances, addressing corners and interfaces as they are reached rather than pre-cutting boards to a fixed layout.
Five Site Problems This Approach Is Designed to Solve
1. Excessive cutting, fitting, and handling.
XPS boards require measuring, cutting, and fitting around columns, beams, and services, plus additional work to restrain them in place. Removing the board layer removes this labour entirely, with the actual time and cost savings depending on site conditions and the approved application sequence.
2. Difficult access around irregular geometry.
Rigid boards are awkward to fit into irregular void shapes. A trowel-applied lightweight concrete plaster can be worked progressively around whatever obstructions the cavity presents, rather than requiring the material to conform to a pre-cut board shape.
3. Additional work from upper-slab filling holes.
The pour-in method requires holes through the upper slab for material placement, which brings scanning, coring, patching, and waterproofing reinstatement into the project scope. Where existing access is sufficient, the internal plaster method can avoid these upper-slab interventions altogether.
4. Hidden gaps that are hard to verify.
A concealed pour can leave real uncertainty behind beams or around services, since nothing about the process confirms the void was actually filled at every point. Progressive placement exposes each working face for inspection before the next layer covers it, supporting a genuine check of coverage and the required contact beneath the upper slab.
5. Pipework becoming inaccessible after filling.
Any void-filling solution needs to account for future maintenance access to existing services. The proposed approach incorporates consultant-approved service enclosures connected to accessible hatches wherever maintenance access is required, establishing an agreed repair route before the surrounding space is closed up.
What the Plaster Method Actually Requires on Site
Applying LIGHTHERM Drymix Plaster in successive layers is not simply a matter of trowelling material onto a wall. The starting face, typically the right-hand side of the cavity, needs proper surface preparation and an approved bonding system before the first layer goes on. Each subsequent 75mm layer is added only once the previous layer has reached a manufacturer-approved recoat condition, generally around two hours later, and a representative trial is required to confirm the actual fill height and working sequence before the method is used across the full area.
Access and safety planning matter just as much as the material application itself. Workers and material supply need to remain on the open side of the advancing face, withdrawing toward the existing access point as filling progresses, and the working route, lighting, ventilation, and emergency arrangements all need to stay clear throughout. The top and bottom contact points, beam pockets, and any approved service enclosures should be inspected at each stage before they are concealed by the next layer, and the final closure at the access end needs a detail that can be completed and checked safely from an accessible position.
Maintenance Access Cannot Be an Afterthought
Filling a void permanently removes the ability to inspect or repair anything inside it, unless access is deliberately planned in advance. Any pipework, valves, or joints requiring future inspection or repair need a consultant-approved enclosure connected to a reachable hatch or chase, not simply a boxed-in pocket with no way back to it. This needs to be defined before filling begins, including the enclosure size, hatch position, seals, and any fire, acoustic, or thermal continuity requirements relevant to the specific application.
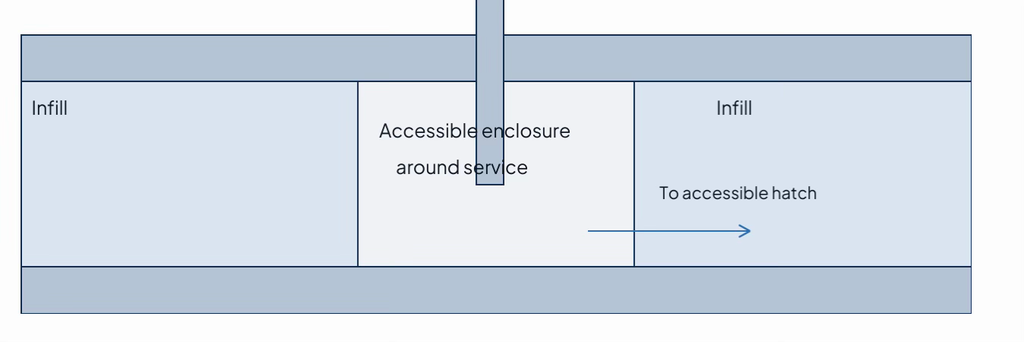
Testing and recording the condition of relevant pipework and waterproofing before the void is closed is equally important. If a leak does occur after filling, the affected service needs to be locatable, isolatable, and reachable through the agreed access route, so that it can be repaired and the surrounding fill and seals reinstated afterward. A permanent service-access void is a deliberate design decision, and it needs to be confirmed as permitted within the project’s required fill extent. If no access void is allowed at all, the alternative repair strategy needs to be agreed before the space is filled, not worked out after the fact.
Vodapruf’s Recommendation
Where project conditions allow, simplifying the build-up by eliminating XPS boards and using the LIGHTHERM Drymix Plaster method reduces handling labour, avoids upper-slab filling holes, and improves visibility during placement compared to a concealed pour. That said, suitability depends entirely on the specific project. The required fill extent, permissible service-access spaces, material density and loading, layer stability, and final closure detail all need project-specific confirmation, and the proposed layer thickness and timing should be verified with the manufacturer and a representative site trial before full installation begins.
For a project-specific assessment of your void-filling requirements, contact Vodapruf for more information.
📞 Malaysia: +60 16 217 7155
📞 Singapore: +65 9796 5910
🌐 vodapruf.com
Frequently Asked Questions
What is LIGHTHERM Drymix Plaster, and how is it different from LIGHTHERM Drymix 250?
LIGHTHERM Drymix Plaster is a trowel-applied thermal plaster formulation designed for progressive vertical-face application inside a cavity, while LIGHTHERM Drymix 250 is poured in place and suited to filling from above through upper-slab openings. Both are lightweight insulating products, but the plaster version is formulated specifically for the layered, hand-applied method described in the void-filling approach.
How thick can each LIGHTHERM Drymix Plaster layer be applied in a void-filling application?
Each layer is proposed at 75mm, measured horizontally on the vertical face, with roughly two hours between applications. This thickness and recoat interval must be confirmed with the manufacturer and verified through a representative site trial before full-scale application, since actual conditions on site can affect timing.
Should I choose the pour-in method or the trowel-applied plaster method for my project?
The trowel-applied plaster method is generally preferred where it avoids drilling holes through the upper slab and allows each working face to be inspected before covering. The pour-in method remains necessary where internal access to the cavity is insufficient for progressive hand application. The right choice depends on existing access conditions specific to the site.
What happens if a void has beams or pipework crossing through the cavity?
Beams and pipework require careful sequencing regardless of method. The trowel-applied approach allows the contractor to work progressively around actual obstructions as the filling face advances, while the pour-in method may need separate vent, fill, and inspection points for each isolated pocket created by beams dividing the cavity into bays.
Can a void-filling project be completed without drilling holes through the upper slab?
Yes, where existing internal access to the cavity is sufficient. The trowel-applied plaster method works from inside the void itself, avoiding the scanning, coring, patching, and waterproofing reinstatement that upper-slab filling holes require. This depends on the specific cavity’s access conditions and should be confirmed on a project-by-project basis.
Does the void-filling method affect future access to services inside the cavity?
Yes, this must be planned before filling begins regardless of method. Any pipework, valves, or joints needing future inspection require a consultant-approved enclosure connected to a reachable hatch or chase. A boxed-in pocket with no reachable opening does not provide genuine repair access once the surrounding space is filled.
What happens if the recoat interval between LIGHTHERM Drymix Plaster layers is not achieved as specified?
Applying a new layer before the previous one reaches the manufacturer-approved recoat condition can affect layer stability and bond quality. The proposed two-hour interval should be verified against actual site conditions through a representative trial, since factors like ambient temperature and humidity can affect how quickly each layer is ready for the next.